
返回文章
ARTICLE
Cesium 全局特效:雨、雪、雾、日照(每种划分有大、中、小)
目前实现了的全屏 Cesium 场景渲染,包括雨、雪、雾、日照以及它们的大、中、小效果,只需要通过一个公共函数触发调用每种场景的着色器代码即可 雾霾选择中等效果是因为大雾看不清 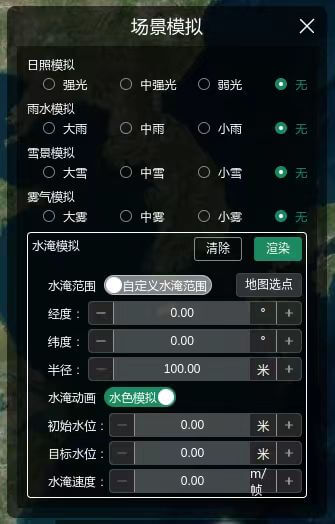 图片1:UI 界面 
Cesium 全局特效:雨、雪、雾、日照(每种划分有大、中、小)
说明
目前实现了的全屏 Cesium 场景渲染,包括雨、雪、雾、日照以及它们的大、中、小效果,只需要通过一个公共函数触发调用每种场景的着色器代码即可
先上效果图
雾霾选择中等效果是因为大雾看不清

图片1:UI 界面
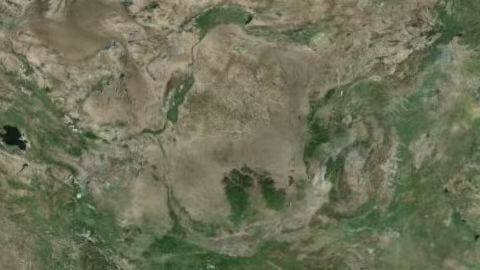
图片2:普通
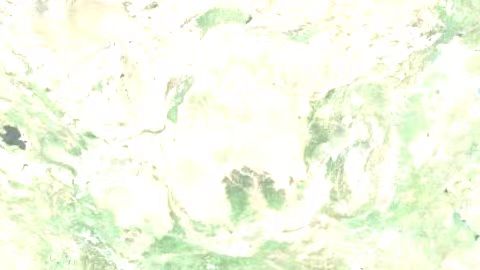
图片3:强光
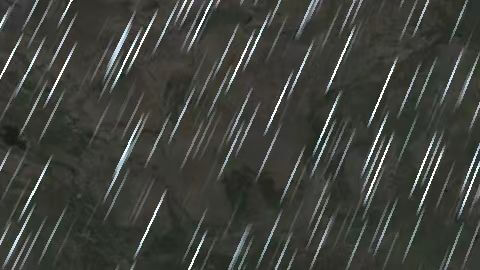
图片4:大雨
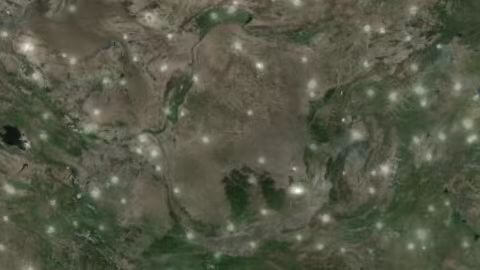
图片5:大雪
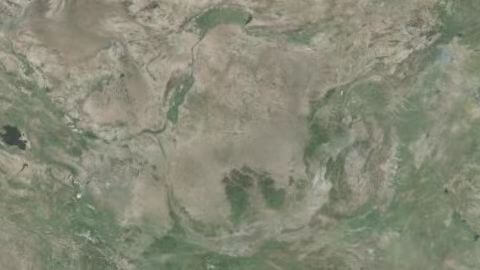
图片6:中雾
公共的实现代码
主要调用代码如下,可以看到,实现不同全屏特效是通过 postProcessStages 调用着色器代码实现的,如果后续要添加其他的效果也大差不差, 只要你能够实现这些着色器代码。
import type { PostProcessStageComposite, Viewer } from 'cesium'
import { PostProcessStage, PostProcessStageLibrary } from 'cesium'

import { fsNameMap } from '@/constants/sceneFs'

import { SCENE_SIM } from '@/constants/tool'

interface SceneSimIF {
    scene: string // 模拟的场景
    level: string // 场景渲染级别
}

// 主要是设置需要着色器渲染的场景
export function setSceneSim(viewer: Viewer, options: SceneSimIF) {
    let sceneSim = <PostProcessStage | PostProcessStageComposite>{}

    switch (options.scene) {
        case SCENE_SIM.RAIN.key:
        case SCENE_SIM.SNOW.key:
        case SCENE_SIM.FOG.key: {
            sceneSim = viewer.scene.postProcessStages.add(new PostProcessStage({
                name: `${SCENE_SIM[options.scene].key}_Scene_Sim`,
                fragmentShader: fsNameMap[SCENE_SIM[options.scene]?.levels?.[options.level]?.fs],
            }))
            break
        }
        case SCENE_SIM.BEAM.key: {
            if (options.level) {
                sceneSim = viewer.scene.postProcessStages.add(PostProcessStageLibrary.createBrightnessStage())
                sceneSim.enabled = true
                sceneSim.uniforms.brightness = SCENE_SIM[options.scene]?.levels?.[options.level]?.brightness // (调节亮度0 - 3最佳)
            }
            break
        }
        default: break
    }

    return sceneSim // 返回出去后,可以根据这个 sceneSim 清除效果
}
全局特效场景参数
// 地球的场景模拟种类
export const SCENE_SIM: { [key: string]: any } = {
    BEAM: {
        name: '日照模拟',
        key: 'BEAM',
        renderKey: 'beam',
        levels: {
            STRONG: { key: 'STRONG', name: '强光', brightness: 2 },
            DEFAULT: { key: 'DEFAULT', name: '中强光', brightness: 1.2 },
            WEAK: { key: 'WEAK', name: '弱光', brightness: 0.8 },
        },
    },
    RAIN: {
        name: '雨水模拟',
        key: 'RAIN',
        renderKey: 'rain',
        levels: {
            LARGE: { key: 'LARGE', name: '大雨', fs: 'large_rain' },
            DEFAULT: { key: 'DEFAULT', name: '中雨', fs: 'default_rain' },
            SMALL: { key: 'SMALL', name: '小雨', fs: 'small_rain' },
        },
    },
    SNOW: {
        name: '雪景模拟',
        key: 'SNOW',
        renderKey: 'snow',
        levels: {
            LARGE: { key: 'LARGE', name: '大雪', fs: 'large_snow' },
            DEFAULT: { key: 'DEFAULT', name: '中雪', fs: 'default_snow' },
            SMALL: { key: 'SMALL', name: '小雪', fs: 'small_snow' },
        },
    },
    FOG: {
        name: '雾气模拟',
        key: 'FOG',
        renderKey: 'fog',
        levels: {
            LARGE: { key: 'LARGE', name: '大雾', fs: 'large_fog' },
            DEFAULT: { key: 'DEFAULT', name: '中雾', fs: 'default_fog' },
            SMALL: { key: 'SMALL', name: '小雾', fs: 'small_fog' },
        },
    },
}
最重要的着色器代码
这里的每一种特效的着色器代码,他们的大、中、小效果其实基本一样,只需要调整你内部的参数值即可
export const large_rain = `//【内置变量】颜色纹理,用于在片元着色器中访问各个像素的颜色
    uniform sampler2D colorTexture;
    //【内置变量】纹理坐标,是从顶点着色器中传递下来的。
    in vec2 v_textureCoordinates;

    float hash(float x){
    //取小数部分
    return fract(sin(x*23.3)*13.13);
    }

    out vec4 vFragColor;
    void main(){
        //将当前帧数转换为以秒为单位的时间
        //在Cesium中,czm_frameNumber是一个递增整数值
        //且一秒钟内,平均会渲染大约60帧,因此除以60可以得到近似的秒数
        float time = czm_frameNumber / 60.0;

        //窗口分辨率
        vec2 resolution = czm_viewport.zw;
        //转换为uv坐标(-1,1)
        //gl_FragCoord.xy 表示当前片段的屏幕坐标(或窗口坐标)的X和Y分量。
        //resolution.xy 表示屏幕或窗口的宽度和高度
        //gl_FragCoord.xy * 2.0 - resolution.xy 将屏幕坐标扩大两倍,然后减去屏幕的宽度和高度。这样处理可以将坐标原点移至屏幕中心。
        vec2 uv=(gl_FragCoord.xy*2.-resolution.xy)/min(resolution.x,resolution.y);

        //雨颜色值(153,178,204),并做归一化处理(除以255)
        vec3 c=vec3(0.6,0.7,0.8);
        //定义雨滴的倾角0.4弧度,转为角度约为23度
        float a=0.4;
        float si=sin(a),co=cos(a);
        //将纹理坐标uv角度a旋转
        uv*=mat2(co,-si,si,co);
        //将纹理坐标进行缩放变换(变形)
        uv*=length(uv+vec2(0,4.9))*0.3+1.0;

        //加入时间time,基础雨滴颜色,及变换后的uv坐标和一系列随机值运算
        //得到每一个像素的雨滴颜色
        float v=1.0-sin(hash(floor(uv.x*100.0))*2.0);
        float b=clamp(abs(sin(20.0*time*v+uv.y*(5.0/(2.0+v))))-0.95,0.0,1.0)*60.;// 这里的60是雨滴大小
        c*=v*b;
        //将雨与场景颜色混合
        //texture(colorTexture, v_textureCoordinates)是获取场景原始颜色值
        vFragColor = mix(texture(colorTexture, v_textureCoordinates), vec4(c, 1),0.6);// 这里的0.6是背景颜色透明度
    }`
export const default_rain = `
    uniform sampler2D colorTexture;
    in vec2 v_textureCoordinates;

    float hash(float x){
    return fract(sin(x*23.3)*13.13);
    }

    out vec4 vFragColor;
    void main(){
        float time = czm_frameNumber / 60.0;

        vec2 resolution = czm_viewport.zw;
        vec2 uv=(gl_FragCoord.xy*2.-resolution.xy)/min(resolution.x,resolution.y);

        vec3 c=vec3(0.6,0.7,0.8);
        float a=0.4;
        float si=sin(a),co=cos(a);
        uv*=mat2(co,-si,si,co);
        uv*=length(uv+vec2(0,4.9))*0.3+1.0;
        float v=1.0-sin(hash(floor(uv.x*100.0))*2.0);
        float b=clamp(abs(sin(20.0*time*v+uv.y*(5.0/(2.0+v))))-0.95,0.0,1.0)*20.;
        c*=v*b;
        vFragColor = mix(texture(colorTexture, v_textureCoordinates), vec4(c, 1),0.4);
    }`
export const small_rain = `
        uniform sampler2D colorTexture;
        in vec2 v_textureCoordinates;

        float hash(float x){
        return fract(sin(x*23.3)*13.13);
        }

        out vec4 vFragColor;
        void main(){
            float time = czm_frameNumber / 60.0;

            vec2 resolution = czm_viewport.zw;
            vec2 uv=(gl_FragCoord.xy*2.-resolution.xy)/min(resolution.x,resolution.y);

            vec3 c=vec3(0.6,0.7,0.8);
            float a=0.4;
            float si=sin(a),co=cos(a);
            uv*=mat2(co,-si,si,co);
            uv*=length(uv+vec2(0,4.9))*0.3+1.0;
            float v=1.0-sin(hash(floor(uv.x*100.0))*2.0);
            float b=clamp(abs(sin(20.0*time*v+uv.y*(5.0/(2.0+v))))-0.95,0.0,1.0)*5.;
            c*=v*b;
            vFragColor = mix(texture(colorTexture, v_textureCoordinates), vec4(c, 1),0.2);
        }`

export const large_snow = `
    uniform sampler2D colorTexture; //输入的场景渲染照片
    in vec2 v_textureCoordinates;

    float snow(vec2 uv,float scale)
    {
        float time = czm_frameNumber / 60.0;
        float w=smoothstep(1.,0.,-uv.y*(scale/10.));if(w<.1)return 0.;
        uv+=time/scale;uv.y+=time*2./scale;uv.x+=sin(uv.y+time*.5)/scale;
        uv*=scale;vec2 s=floor(uv),f=fract(uv),p;float k=3.,d;
        p=.5+.35*sin(11.*fract(sin((s+p+scale)*mat2(7,3,6,5))*5.))-f;d=length(p);k=min(d,k);
        k=smoothstep(0.,k,sin(f.x+f.y)*0.03);
        return k*w;
    }

    out vec4 vFragColor;
    void main(void){
        vec2 resolution = czm_viewport.zw;
        vec2 uv=(gl_FragCoord.xy*2.-resolution.xy)/min(resolution.x,resolution.y);
        vec3 finalColor=vec3(0);
        //float c=smoothstep(1.,0.3,clamp(uv.y*.3+.8,0.,.75));
        float c = 0.0;
        c+=snow(uv,30.)*.0;
        c+=snow(uv,20.)*.0;
        c+=snow(uv,15.)*.0;
        c+=snow(uv,10.);
        c+=snow(uv,8.);
        c+=snow(uv,6.);
        c+=snow(uv,5.);
        finalColor=(vec3(c)); //屏幕上雪的颜色
        vFragColor = mix(texture(colorTexture, v_textureCoordinates), vec4(finalColor,1), 0.3);  //将雪和三维场景融合
    }
  `
export const default_snow = `
    uniform sampler2D colorTexture; //输入的场景渲染照片
    in vec2 v_textureCoordinates;

    float snow(vec2 uv,float scale)
    {
        float time = czm_frameNumber / 60.0;
        float w=smoothstep(1.,0.,-uv.y*(scale/10.));if(w<.1)return 0.;
        uv+=time/scale;uv.y+=time*2./scale;uv.x+=sin(uv.y+time*.5)/scale;
        uv*=scale;vec2 s=floor(uv),f=fract(uv),p;float k=3.,d;
        p=.5+.35*sin(11.*fract(sin((s+p+scale)*mat2(7,3,6,5))*5.))-f;d=length(p);k=min(d,k);
        k=smoothstep(0.,k,sin(f.x+f.y)*0.02);
        return k*w;
    }

    out vec4 vFragColor;
    void main(void){
        vec2 resolution = czm_viewport.zw;
        vec2 uv=(gl_FragCoord.xy*2.-resolution.xy)/min(resolution.x,resolution.y);
        vec3 finalColor=vec3(0);
        //float c=smoothstep(1.,0.3,clamp(uv.y*.3+.8,0.,.75));
        float c = 0.0;
        c+=snow(uv,30.)*.0;
        c+=snow(uv,20.)*.0;
        c+=snow(uv,15.)*.0;
        c+=snow(uv,10.);
        c+=snow(uv,8.);
        c+=snow(uv,6.);
        c+=snow(uv,5.);
        finalColor=(vec3(c)); //屏幕上雪的颜色
        vFragColor = mix(texture(colorTexture, v_textureCoordinates), vec4(finalColor,1), 0.3);  //将雪和三维场景融合
    }
  `
export const small_snow = `
    uniform sampler2D colorTexture; //输入的场景渲染照片
    in vec2 v_textureCoordinates;

    float snow(vec2 uv,float scale)
    {
        float time = czm_frameNumber / 60.0;
        float w=smoothstep(1.,0.,-uv.y*(scale/10.));if(w<.1)return 0.;
        uv+=time/scale;uv.y+=time*2./scale;uv.x+=sin(uv.y+time*.5)/scale;
        uv*=scale;vec2 s=floor(uv),f=fract(uv),p;float k=3.,d;
        p=.5+.35*sin(11.*fract(sin((s+p+scale)*mat2(7,3,6,5))*5.))-f;d=length(p);k=min(d,k);
        k=smoothstep(0.,k,sin(f.x+f.y)*0.01);
        return k*w;
    }

    out vec4 vFragColor;
    void main(void){
        vec2 resolution = czm_viewport.zw;
        vec2 uv=(gl_FragCoord.xy*2.-resolution.xy)/min(resolution.x,resolution.y);
        vec3 finalColor=vec3(0);
        //float c=smoothstep(1.,0.3,clamp(uv.y*.3+.8,0.,.75));
        float c = 0.0;
        c+=snow(uv,30.)*.0;
        c+=snow(uv,20.)*.0;
        c+=snow(uv,15.)*.0;
        c+=snow(uv,10.);
        c+=snow(uv,8.);
        c+=snow(uv,6.);
        c+=snow(uv,5.);
        finalColor=(vec3(c)); //屏幕上雪的颜色
        vFragColor = mix(texture(colorTexture, v_textureCoordinates), vec4(finalColor,1), 0.3);  //将雪和三维场景融合
    }
  `

export const large_fog = `
    uniform sampler2D colorTexture;
    uniform sampler2D depthTexture;
    in vec2 v_textureCoordinates;

    out vec4 vFragColor;
    void main(void){
        vec4 origcolor=texture(colorTexture, v_textureCoordinates);
        vec4 fogcolor=vec4(0.8,0.8,0.8,0.5);

        float depth = czm_readDepth(depthTexture, v_textureCoordinates);
        vec4 depthcolor=texture(depthTexture, v_textureCoordinates);
        float f=(depthcolor.r-0.22)/0.8;
        if(f<0.0) f=0.0;
        else if(f>1.0) f=1.0;
        vFragColor = mix(origcolor,fogcolor,f);
    }
    `
export const default_fog = `
    uniform sampler2D colorTexture;
    uniform sampler2D depthTexture;
    in vec2 v_textureCoordinates;

    out vec4 vFragColor;
    void main(void){
        vec4 origcolor=texture(colorTexture, v_textureCoordinates);
        vec4 fogcolor=vec4(0.8,0.8,0.8,0.3);

        float depth = czm_readDepth(depthTexture, v_textureCoordinates);
        vec4 depthcolor=texture(depthTexture, v_textureCoordinates);
        float f=(depthcolor.r-0.22)/2.8;
        if(f<0.0) f=0.0;
        else if(f>1.0) f=1.0;
        vFragColor = mix(origcolor,fogcolor,f);
    }
    `
export const small_fog = `
    uniform sampler2D colorTexture;
    uniform sampler2D depthTexture;
    in vec2 v_textureCoordinates;

    out vec4 vFragColor;
    void main(void){
        vec4 origcolor=texture(colorTexture, v_textureCoordinates);
        vec4 fogcolor=vec4(0.8,0.8,0.8,0.1);

        float depth = czm_readDepth(depthTexture, v_textureCoordinates);
        vec4 depthcolor=texture(depthTexture, v_textureCoordinates);
        float f=(depthcolor.r-0.22)/4.8;
        if(f<0.0) f=0.0;
        else if(f>1.0) f=1.0;
        vFragColor = mix(origcolor,fogcolor,f);
    }
    `

export const fsNameMap: { [key: string]: any } = {
    large_rain,
    default_rain,
    small_rain,

    large_snow,
    default_snow,
    small_snow,

    large_fog,
    default_fog,
    small_fog,

}
那么如何清除这些效果呢
公共渲染函数中我返回了 sceneSim,我们的清除就需要利用这个
viewer.scene.postProcessStages.remove(sceneSim)